
![]()
Monday, December 12, 2016
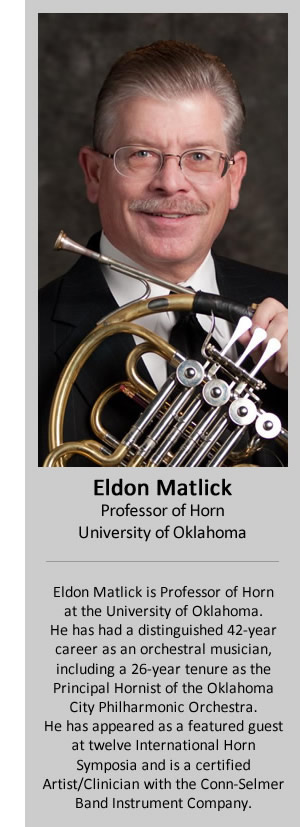
Horn Basics for Band Directors
by Eldon Matlick
 Over the years of working with public school students, I have experienced some common errors/faults with young horn players and upon this request to write this article, I will outline common faults that adversely affect the success of young horn players.
Carriage/Posture
The horn is not a very ergonomic instrument and it is common to see bad posture resulting from spinal contortion to neck manipulation, which hinders effective breathing and use of air. My mantra for young players is 'work from a position of strength.'
When working with a young student, I will ask that the hornist free buzz. For those that cannot, I ask them to form the embouchure and blow out a stream of air. It is essential to find the direction of the air. Normally it should be at a slightly downward angle. If it is brushing past the chin, that is indicative of the bottom lip being rolled in, thus hindering a free and resonant buzz. Likewise, if the air goes upward, that would indicate a severe under bite or protruding jaw, or possibly the bottom lip being pushed out. At any rate this and the former examples are those that need to be fix immediately.
To reiterate basic horn embouchure, I have the student say 'ah' then put their lips together as saying an 'm'. Then I have them flatten the chin muscle in a downward position while having them feel the incisors with their corners. I even recommend that they feel as if the corners have tight springs hooking around these canine teeth. When this happens, often there occurs a natural aperture opening to where I then ask the student to blow air out. It is not necessary for a free buzz to occur. The student and I need to find out the direction of the air stream. Once found, then when the instrument is brought to the lips, the lead pipe should be at the same angle as the air escaping between the lips. Another way to do this is have the person hold the instrument off the leg and play a sustained note. While this note is sustained, have the student hold the head steady and slowly elevate the horn at an upward angle and then lower it. There will be a point where the sound opens and becomes more resonant. This is the most effective angle.
Neck Constriction
Other causes of natural constriction of sound is with the position of the head and neck. It is not unusual to find a young player tilting, craning and jutting the neck when playing the instrument. I see this more in younger and smaller players. However, very tall students will sometimes be found to hunch over and twist the neck to come to the instrument. I recommend the following procedure to find the most effective playing position for the hornist.
1. Sitting up near the edge of the chair have the student hold the head up. Saying 'ah', have the student slowly move the head forward, then backward. Under your guidance, see where the voice gets strained, then becomes resonant. At this point, the head will be perfectly centered over the neck support and the airway and throat will be open.
2. Next, have the student again say 'ah' this time moving the head up and down. Have them notice where the voice constricts. Locate the position of most resonance. Thus, this forward to front and up to down will locate the most efficient head position.
3. At this point, have the student bring the horn up to the lips, making sure it is at the same angle as the expulsion of the air stream. Do this repeatedly so the student can identify with this position.
4. As the student is holding the instrument at this desired position, move the bell of the horn down to the leg. Some slight modification in posture such as moving back or forward in the chair, swinging the right leg over the corner or some other modification may need to be address so this angle is preserved. It may prove necessary for some smaller students to swing the right leg over the corner and then slightly rotate the torso left to bring the instrument down to position. For some students, it may be prudent to have them support the bell off the leg.
Creating the Foundation of a Good Sound. Getting a Good Buzz Going!
One of the first things I do with any student is to make sure they are producing the most efficient sound possible. To do this I work with the basic buzz.
If possible, I ask the student to free buzz. Any pitch will do. If students can't do this, it is often because they are clamping the lips. By selecting a lower sound, usually success will follow. For those that still have trouble, I have them place two fingers on either side of the aperture, creating a faux rim contact. Once this is happening, I have them take a deep breath and blow out a buzz. I stress these exercises as breath attacks, as it will make the student pressurize the air stream immediately with the support. Most of the time I am successful, but with a small percentage, I start with the next step.
I next have the student take a complete breath, place the mouthpiece on their lips and produce a buzz. It is essential to not have the buzz pinched or strained. There is wind in the buzz, but also a resonant 'buzz' that is big and has lots of color. I'm not looking for a foggy, diffuse buzz, rather a colorful 'buzzy' buzz produced with an air stream moving with the velocity of an extended sigh.
When this has been accomplished to my satisfaction, I then have the student put the mouthpiece in the horn, but have them disengage the tuning slide, keeping it attached to the lead pipe, but not connected to the body of the horn. I have them continue the process of producing these resonant buzzes in the lead pipe with breath attacks. Each time, I have the student hold the notes out longer, 4, 8, 12 counts.
Next I have them reattach the tuning slide and have them do the same process on a second line g. I build up to where the note can be sustained for twelve counts. Once accomplished I will then have them play long tones for 12 counts starting on g, going down chromatically and then returning to the g in the interim. Between notes, I have them inhale for four counts. All during this exercise I use breath attacks exclusively.
From here I go to various overtone slurs with the stipulation that the air movement here is exactly the same as when playing static notes.
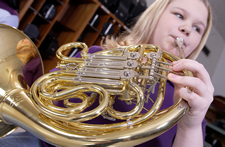 Hand Position
This is a universal problem for most horn players. Bad ingrained habits are hard to break and even some of my collegiate hornists revert to bad habits. I even have noticed questionable hand positions on professionals!
What is the purpose of the hand in the bell? It offers a baffle for slight intonation adjustments, creates stability in upper range playing, and helps with projection in special circumstances. Too often I see the hand flopped into the bell like a hunk of meat. Depending upon the type of bell throat the instrument has can determine the most effective hand position.
The basic configuration of the hand is that of a swimmer; a relatively flat hand with fingers together and the thumb aligned on the side without gaps. This later point is essential in the case of hand stopping.
In general, this flat hand is inserted into the bell with the back of the fingers AND FINGERNAILS touching the bell wall. Insert the hand into the bell where the thumb is just to the right of the bell brace and move forward to where the knuckles start feeling the curvature of the bell. At this point, the palm of the hand is pointing between 9 and 10 o'clock.
It is essential that the hand is out of the bell far enough to help for stability from 3rd space C upwards. Without the hand in the bell, the notes will not lock in place and will create accuracy problems. Too far into the bell throat, intonation will be extremely flat and the tone will become stuffy, as if constipating the natural tone of the horn.
Moving the hand from 9, 10, 11, and 12 o'clock positions will affect the sound. Closer to 12 o'clock, the sound gets more open. Thus, if there is a prominent horn passage that needs to come out, recommend to your horn players to use the 12 position for better clarity and projection. In general, large throated horns such as the Conn 8D benefit from the 12 position being the default hand position. Smaller throated instruments such as the Yamaha 667 and Conn 11D benefit from the 10 position as these instruments already have better projection and the slight softening of the timbre would be desirable. Also, for those that support the bell off the leg, the 10 o'clock hand position allows the weight of the horn to be supported by the thumb and right index knuckles and first thumb joint.
With either of these hand positions, if negotiating a stopped (hand muted) passage, all that would be needed would be to swing the palm over the bell throat, sealing the bell throat with the heel of the hand. If such a passage occurs, have the student transpose 1/2 step down on the F side. The process of stopped horn and why is too complicated for this space. Suffice that, for now, the hand seals off the bell causing the instrument to rise 1/2 step on the F side and that the desired note needs to be played 1/2 step down. The reason the Bb horn doesn't work is that the instrument is shorter and the same amount of cut off is proportionally greater cutting of 3/4 of a step. This is a white lie, but will suffice. An exact reason of what happens is too time consuming for this space.
The right hand, correctly formed and placed, should not affect the general quality of the horn tone. Too many people try to mask bad sounds by covering up the bell. Insertion of the hand in the bell should not make the sound better. To work on improving tone quality, remove the hand from the bell. Once fixed, put the hand back to add stability.
From middle C, downwards, the hand has no acoustical help for range. However, it can help in projection. For passages in this lower register, the hand should be in the 12 o'clock position and pulled a bit further out and the heel of the hand slightly more cupped to act as a baffle to shoot the low register notes better towards the front.
Breathing
The horn is a surprisingly long instrument. The F side is as long as an F attachment bass trombone and the Bb side is as long as a straight tenor trombone. However, we use a small mouthpiece. It is essential that students be encouraged to blow through the instrument with an unrestricted air flow.
With younger students, have them blow into their lead pipe. The air will be quickly gone. Repeat, having them experience the follow through of putting air through this large amount of tubing. Then put the mouthpiece on the instrument and have then blow without buzzing. They will notice the air backing up. At this point of resistance, we cease the forward movement of velocity air. Instead we now think of density air. In other words, using additional air by blowing more slowly and intensely. Have them think of getting an A on a crucial test and the relief of knowing they aced it.
Because the horn can be a physically demanding instrument with regards to air, it becomes important that horn players (as well as all brasses), activate all four regions of the chest cavity when breathing. To be sure, not all areas will be used all the time, but in high intensity and extreme upper and lower range, all areas will need to be engaged.
1. Area 1 -- lower abdominal area around belt line. Mainly used in middle range soft playing or short passages
2. Area 2 -- Kidney/lower rib cage. Moderate phrase length or moderate volume levels
3. Area 3 -- Upper back beneath shoulder blades. Big playing, high intensity levels.
4. Area 4 -- Upper chest. For extreme upper or lower range playing. Big phrases and highest intensity levels.
According to the job that must be done, the student should select the region where the air will fill. Air is taken in order of the regions, (1,2,3,4). When it is used, the player uses the air in the same order (1,2,3,4). Thus, in taking a complete breath and using all the air, the last area that deflates is area 4. The effect of using air is that of squeezing a toothpaste tube from the bottom. In this case, it is the air that is moving up.
I stress to my students that air is fuel for the sound. We don't want to drive an economy car; we drive a Porsche. With a copious supply of fuel and a resonant buzz, with good posture and hand position that helps with stability and projection, we are working from a position of strength
Tuning the Double Horn
An improperly adjusted horn will create major problems for any hornist. To make the horn work correctly, we must make sure that it is in tune with itself and across the double horn so that accuracy and fatigue will not become a hindrance for us.
Follow the steps and you should have an instrument that will not fight you on intonation. However, if the instrument that cannot be adjusted (faulty tubing lengths, frozen slides, etc.), then you as a band director and proctor of the instrument inventory must take immediate action to correct these defects by visiting a competent repairperson.
Before starting, one must understand how your horn works. The first moveable slide you come to following lead pipe is the main tuning slide. This tunes both the F and Bb side of the instrument. You will use this slide to first tune the open C (concert F) on the Bb side of the instrument to a piano or tuner. The other large slide on the back side of the instrument is the auxiliary F tuning slide. Once the open horn on the Bb side is tuned, you then tune the F open horn to the Bb horn.
A caveat on the tuning procedure: 1. Make sure that you always start with the note that is in tune, and then go to the slide that needs to be adjusted. 2. Double check your adjustments. Not only go across the instrument slurring, but also with a decidedly detached, crisp attack. Many times you will find the instrument will behave differently slurring across or attacking. I recommend that reattacking the note may be the way a person normally plays and would be the basis of making a final adjustment.
Follow the numbers on the tuning procedure below:
| Bb Horn | F Horn |
| 1. C (3rd space) -- adjust main tuning slide | |
| 2. C -- adjust aux F tuning slide to match | |
| 3. C (1st finger) adjust 1st finger slide loop | |
| 4. Bb -- this is in-tune reference note to tune he Bb side | |
| 5. Bb -- adjust 1st valve slide loop | |
| 6. D -- play 4th line open -- reference note | |
| 7. D -- adjust pitch with 2nd slide loop only | |
| 8. B -- in-tune reference note | |
| 9. B -- adjust 2nd valve loop | |
| 10. A cross check | 10. A cross check |
*It is normal that the Bb and F sides are slightly different. Usually the Bb side is the slightest bit sharp. If it is significantly different, stop and re-tune using the above procedure
While individual valves may be adjusted so that the loops are in tune, there are problems once valves are used in combination.
Example:
| Open Horn | Valve Loop Length | Pitch Produced |
| 100" | 0" | C |
| 100" | 4" (2nd valve) | B |
| 100" | 8" (1st valve) | Bb |
| 100" | 12" (1st and 2nd valve) | A (sharp) |
Why this is:
- 4 inches added to 100 inches lowers the open horn a semitone
- 4 inches added to 108 inches is not great enough to lower this length a true half-step.
- It is a smaller ratio than the former (eg. 4:100 vs. 4:108). Thus, as we add more tubing (e.g. longer valve combination/more valves) our instrument becomes increasingly sharp!*
- 1 & 2 slightly sharp; 2 & 3 is noticeably sharp; 1 & 3 very sharp; 1, 2, & 3 excruciatingly sharp
*Because of this, we play our low D and low C# on the Bb side of the instrument
Now let us continue with the tuning procedure:
| Bb Horn | F Horn |
| 11. A (1&2) combo reference pitch | |
| 12. A (3rd valve) tune slightly flat* | |
| 13. A (3rd valve) reference pitch | |
| 14. A (3rd valve) adjust to match Bb |
This slightly lowering of the 3rd valve helps negate some of the sharpness of the 2 & 3 valve combination while allowing the 3rd valve to be used as a substitute fingering for the normal 1 & 2 valve combination.
I hope this article will help band directors and horn teachers in their quest to understand the Horn and to help students with some common problems I have seen in my various clinics across country.
Contact Your Local Palen Music Center Representative
Can we assist you with
anything? Please contact your local Palen Music Center school road
representative for all of your music education needs.